
前置知识(LockSupport)
简介
LockSupport是用来创建锁和其他同步工具类的基本线程阻塞原语。
java锁和同步器框架的核心 AQS: AbstractQueuedSynchronizer,就是通过调用 LockSupport .park()和 LockSupport .unpark()实现线程的阻塞和唤醒 的。 LockSupport 很类似于二元信号量(只有1个许可证可供使用),如果这个许可还没有被占用,当前线程获取许可并继 续 执行;如果许可已经被占用,当前线 程阻塞,等待获取许可。
LockSupport类属性
public class LockSupport {
    // Hotspot implementation via intrinsics API
    private static final sun.misc.Unsafe UNSAFE;
    // 表示内存偏移地址
    private static final long parkBlockerOffset;
    // 表示内存偏移地址
    private static final long SEED;
    // 表示内存偏移地址
    private static final long PROBE;
    // 表示内存偏移地址
    private static final long SECONDARY;

    static {
        try {
            // 获取Unsafe实例
            UNSAFE = sun.misc.Unsafe.getUnsafe();
            // 线程类类型
            Class<?> tk = Thread.class;
            // 获取Thread的parkBlocker字段的内存偏移地址
            parkBlockerOffset = UNSAFE.objectFieldOffset
                (tk.getDeclaredField("parkBlocker"));
            // 获取Thread的threadLocalRandomSeed字段的内存偏移地址
            SEED = UNSAFE.objectFieldOffset
                (tk.getDeclaredField("threadLocalRandomSeed"));
            // 获取Thread的threadLocalRandomProbe字段的内存偏移地址
            PROBE = UNSAFE.objectFieldOffset
                (tk.getDeclaredField("threadLocalRandomProbe"));
            // 获取Thread的threadLocalRandomSecondarySeed字段的内存偏移地址
            SECONDARY = UNSAFE.objectFieldOffset
                (tk.getDeclaredField("threadLocalRandomSecondarySeed"));
        } catch (Exception ex) { throw new Error(ex); }
    }
}
// 私有构造函数,无法被实例化
private LockSupport() {}
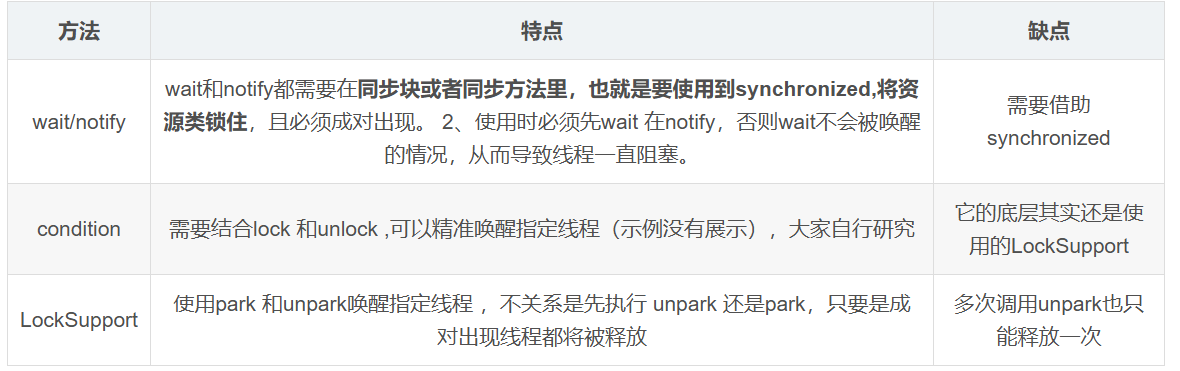
三种让线程等待和唤醒的方法
1.使用wait和notify
 public class ObjectWait {

    public static void main(String[] args) {
        Object o = new Object();


        Thread t = new Thread(new Runnable() {
            @Override
            public void run() {

                System.out.println("线程A被o.wait()阻塞前");
                synchronized(o){
                    try {
                        o.wait();
                    } catch (InterruptedException e) {
                        e.printStackTrace();
                    }

                }
                System.out.println("线程A被线程B o.notify()唤醒");

            }
        },"A");

        t.start();


        try {
            Thread.sleep(100);
        } catch (InterruptedException e) {
            e.printStackTrace();
        }

        new Thread(new Runnable() {
            @Override
            public void run() {
                System.out.println("线程B唤醒线程A");
                synchronized (o){
                    o.notify();
                }
            }
        },"B").start();
    }
}

线程A被o.wait()阻塞前
线程B唤醒线程A
线程A被线程B o.notify()唤醒
2.使用lock.condition
public class ConditionAwait {

    public static void main(String[] args) {

        Lock lock = new ReentrantLock();
        Condition condition = lock.newCondition();

        new Thread(new Runnable() {
            @Override
            public void run() {

                System.out.println("线程A被condition.await()阻塞前");

                try {
                    lock.lock();
                    condition.await();
                } catch (InterruptedException e) {
                    e.printStackTrace();
                }finally {
                    lock.unlock();
                }
                System.out.println("线程A被线程B condition.signl()唤醒");
            }
        }, "A").start();


        new Thread(new Runnable() {
            @Override
            public void run() {


                try {
                    lock.lock();

                    System.out.println("线程B中使用condition.signal()唤醒线程A");
                    condition.signal();
                }catch (Exception e){


                }finally {
                    lock.unlock();
                }

            }
        }, "B").start();

    }
}

结果:
线程A被condition.await()阻塞前
线程B中使用condition.signal()唤醒线程A
线程A被线程B condition.signl()唤醒
3.使用locksupport
 public class LockSupportDemo {

    public static void main(String[] args) {

        Thread t = new Thread(new Runnable() {
            @Override
            public void run() {

                System.out.println("线程A被LockSupport.park()阻塞");
                LockSupport.park();

                System.out.println("线程A被线程B LockSupport.unpark()唤醒");

            }
        },"A");

        t.start();

        new Thread(new Runnable() {
            @Override
            public void run() {
                System.out.println("线程B唤醒线程A");
                // 唤醒指定线程t,也就是A
                LockSupport.unpark(t);
            }
        },"B").start();
    }
}

结果:
线程A被LockSupport.park()阻塞
线程B唤醒线程A
线程A被线程B LockSupport.unpark()唤醒
使用interrupt中断阻塞
 package CompleteFuture;

import java.util.concurrent.locks.LockSupport;

public class LockSupportDemo {

    public static void main(String[] args) {

        Thread t = new Thread(new Runnable() {
            @Override
            public void run() {

                System.out.println("before park");
                LockSupport.park();
                System.out.println("after park");

            }
        },"A");

        t.start();


       //确保 park()执行
        try {
            Thread.sleep(3000);
        } catch (InterruptedException e) {
            e.printStackTrace();
        }
//        System.out.println("线程t是否被阻塞: "+t.isInterrupted());
        System.out.println("before interrupted");
        t.interrupt();
        System.out.println("after interrupted");

    }
}

结果:
before park
before interrupted
after interrupted
after park
LockSupport源码分析
1.park()
/**Disables the current thread for thread scheduling purposes unless the permit is available.
If the permit is available then it is consumed and the call returns immediately; otherwise the current thread becomes disabled for thread scheduling purposes and lies dormant until one of three things happens:
Some other thread invokes unpark with the current thread as the target; or
Some other thread interrupts the current thread; or
The call spuriously (that is, for no reason) returns.
This method does not report which of these caused the method to return. Callers should re-check the conditions which caused the thread to park in the first place. Callers may also determine, for example, the interrupt status of the thread upon return.
*/
public static void park() {
        UNSAFE.park(false, 0L);
    }
如果没有permit许可,那么调用该方法后,当前线程立马停止执行计划(阻塞),直到有一下3中情况发生:
1、其他线程调用unpark(被阻塞线程引用)方法,参数为需要唤醒的线程;
2、其他线程中断当前线程;
3、调用虚假(即无缘无故)返回;
UNSAFE.park(isAbsolute,timeout)的理解,阻塞一个线程直到unpark出现、线程
被中断或者timeout时间到期。如果一个unpark调用已经出现了,
这里只计数。timeout为0表示永不过期.当isAbsolute为true时,
timeout是相对于新纪元之后的毫秒。否则这个值就是超时前的纳秒数。这个方法执行时
也可能不合理地返回(没有具体原因)
2.unpark(Thread thread)
  public static void unpark(Thread thread) {
        if (thread != null)
            UNSAFE.unpark(thread);
    }
给指定的线程提供unblock凭证。如果指定的线程使用了park(),则线程变成非阻塞。如果没有使用park,则线程下一次使用park时,线程不会阻塞。
park(blocker)锁定指定对象
 public static void park(Object blocker) {
    // 获取当前线程
    Thread t = Thread.currentThread();
    // 设置Blocker
    setBlocker(t, blocker);
    // 获取许可
    UNSAFE.park(false, 0L);
    // 重新可运行后再此设置Blocker
    setBlocker(t, null);
}
调用park函数时,首先获取当前线程,然后设置当前线程的parkBlocker字段,即调用setBlocker函数,之后调用Unsafe类的park函数,之后再调用setBlocker函数。那么问题来了,为什么要在此park函数中要调用两次setBlocker函数呢? 原因其实很简单,调用park函数时,当前线程首先设置好parkBlocker字段,然后再调用Unsafe的park函数,此后,当前线程就已经阻塞了,等待该线程的unpark函数被调用,所以后面的一个setBlocker函数无法运行,unpark函数被调用,该线程获得许可后,就可以继续运行了,也就运行第二个setBlocker,把该线程的parkBlocker字段设置为null,这样就完成了整个park函数的逻辑。如果没有第二个setBlocker,那么之后没有调用park(Object blocker),而直接调用getBlocker函数,得到的还是前一个park(Object blocker)设置的blocker,显然是不符合逻辑的。总之,必须要保证在park(Object blocker)整个函数执行完后,该线程的parkBlocker字段又恢复为null。所以,park(Object)型函数里必须要调用setBlocker函数两次。
三种阻塞方法的区别
Thread.sleep()和Object.wait()的区别
Thread.sleep()不会释放占有的锁,Object.wait()会释放占有的锁;
Object.wait()和Condition.await()的区别
Object.wait()和Condition.await()的原理是基本一致的,不同的是Condition.await()底层是调用LockSupport.park()来实现阻塞当前线程的。
实际上,它在阻塞当前线程之前还干了两件事,一是把当前线程添加到条件队列中,二是“完全”释放锁,也就是让state状态变量变为0,然后才是调用LockSupport.park()阻塞当前线程。
Thread.sleep()和LockSupport.park()的区别
LockSupport.park()还有几个兄弟方法——parkNanos()、parkUtil()等,我们这里说的park()方法统称这一类方法。
从功能上来说,Thread.sleep()和LockSupport.park()方法类似,都是阻塞当前线程的执行,且都不会释放当前线程占有的锁资源;
Thread.sleep()没法从外部唤醒,只能自己醒过来;
LockSupport.park()方法可以被另一个线程调用LockSupport.unpark()方法唤醒;
Thread.sleep()方法声明上抛出了InterruptedException中断异常,所以调用者需要捕获这个异常或者再抛出;
LockSupport.park()方法不需要捕获中断异常;
Thread.sleep()本身就是一个native方法; LockSupport.park()底层是调用的Unsafe的native方法;
Object.wait()和LockSupport.park()的区别 二者都会阻塞当前线程的运行,他们有什么区别呢?
Object.wait()方法需要在synchronized块中执行; LockSupport.park()可以在任意地方执行;
Object.wait()方法声明抛出了中断异常,调用者需要捕获或者再抛出
LockSupport.park()不需要捕获中断异常;
Object.wait()不带超时的,需要另一个线程执行notify()来唤醒,但不一定继续执行后续内容;
LockSupport.park()不带超时的,需要另一个线程执行unpark()来唤醒,一定会继续执行后续内容;
park()/unpark()底层的原理是“二元信号量”,你可以把它相像成只有一个许可证的Semaphore,只不过这个信号量在重复执行unpark()的时候也不会再增加许可证,最多只有一个许可证。
如果在wait()之前执行了notify()会怎样?
如果当前的线程不是此对象锁的所有者,却调用该对象的notify()或wait()方法时抛出IllegalMonitorStateException异常;
如果当前线程是此对象锁的所有者,wait()将一直阻塞,因为后续将没有其它notify()唤醒它。
如果在park()之前执行了unpark()会怎样?
线程不会被阻塞,直接跳过park(),继续执行后续内容
LockSupport.park()会释放锁资源吗?
不会,它只负责阻塞当前线程,释放锁资源实际上是在Condition的await()方法中实现的。
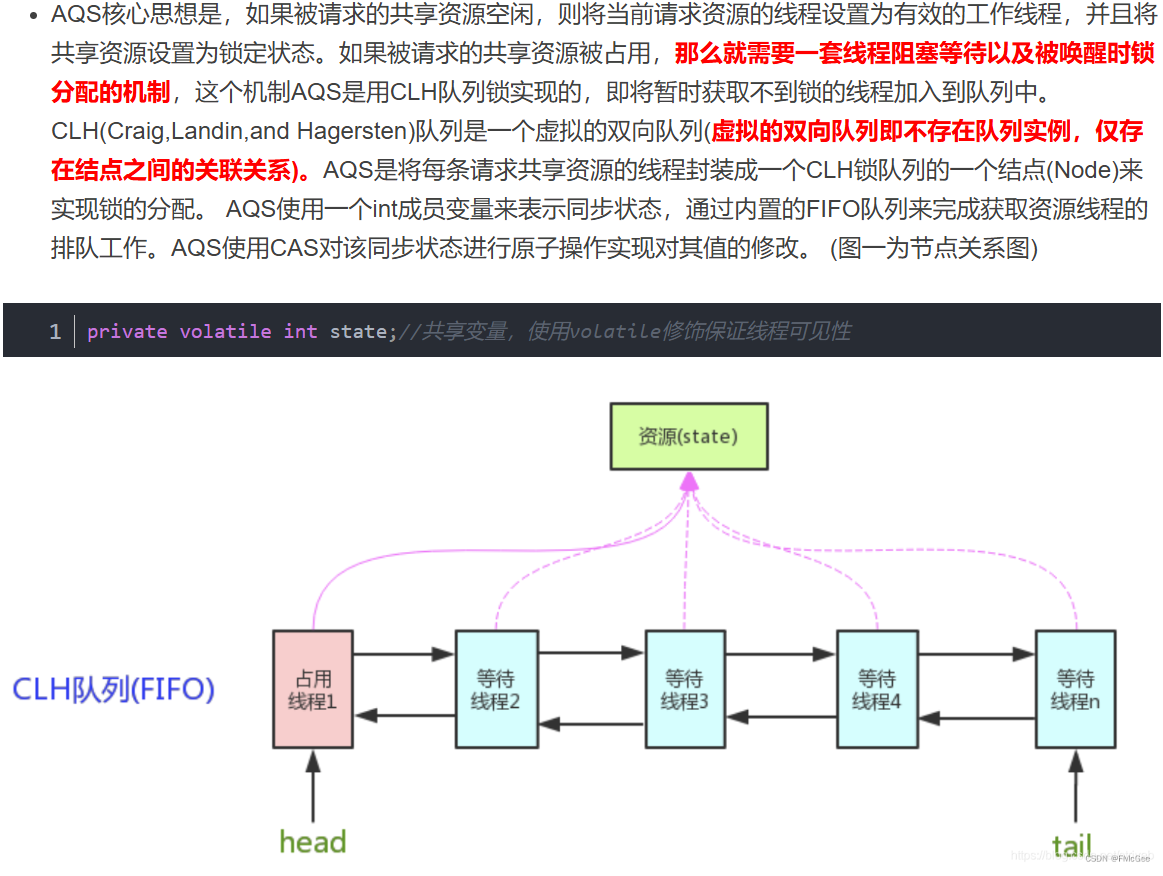
AQS
简介
AQS是一个用来构建锁和同步器的框架,使用AQS能简单且高效地构造出应用广泛的大量的同步器,比如我们提到的ReentrantLock,Semaphore,其他的诸如ReentrantReadWriteLock,SynchronousQueue,FutureTask等等皆是基于AQS的。当然,我们自己也能利用AQS非常轻松容易地构造出符合我们自己需求的同步器。
AQS核心思想
AQS源码分析
AQS 主要有三大属性分别是 head ,tail, state,其中state 表示同步状态,head为等待队列的头结点,tail 指向队列的尾节点。
/**
* Head of the wait queue, lazily initialized. Except for
* initialization, it is modified only via method setHead. Note:
* If head exists, its waitStatus is guaranteed not to be
* CANCELLED.
*/
private transient volatile Node head;
/**
* Tail of the wait queue, lazily initialized. Modified only via
* method enq to add new wait node.
*/
private transient volatile Node tail;
/**
* The synchronization state.
*/
private volatile int state;
在这里插入代码片
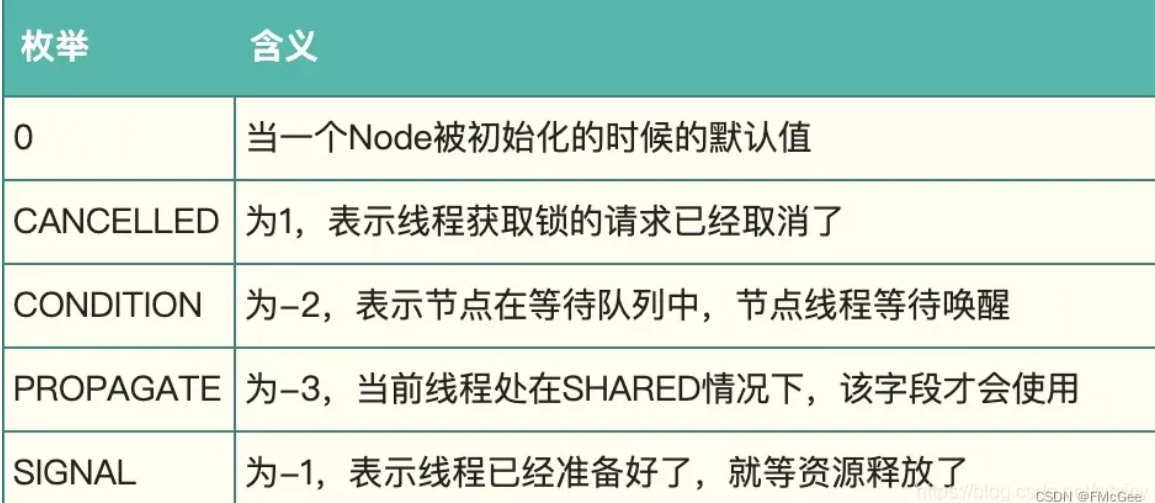
class Node{
//节点等待状态
volatile int waitStatus;
// 双向链表当前节点前节点
volatile Node prev;
// 下一个节点
volatile Node next;
// 当前节点存放的线程
volatile Thread thread;
// condition条件等待的下一个节点
Node nextWaiter;
}
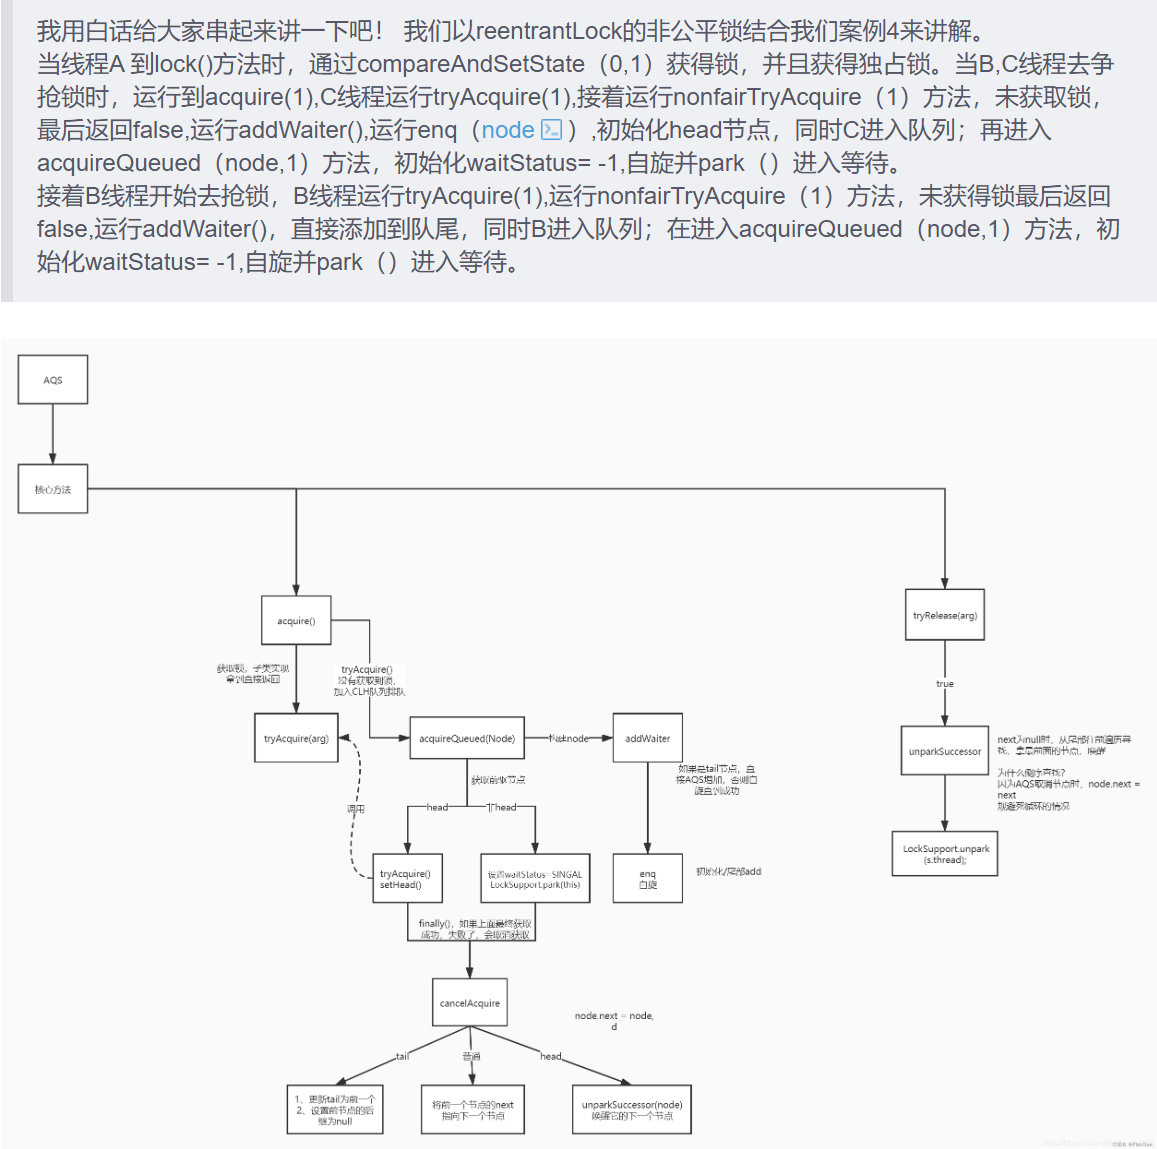
lock()源码分析
final void lock() {
            //1、判断当前state 状态, 没有锁则当前线程抢占锁
            if (compareAndSetState(0, 1))
                // 独占锁
                setExclusiveOwnerThread(Thread.currentThread());
            else
                // 2、锁被人占了,尝试获取锁,关键方法了
                acquire(1);
        }

  public final void acquire(int arg) {
        if (!tryAcquire(arg) &&
            acquireQueued(addWaiter(Node.EXCLUSIVE), arg))
            selfInterrupt();
    }
tryacquire分析
   final boolean nonfairTryAcquire(int acquires) {
            //1、获取当前线程
            final Thread current = Thread.currentThread();
            // 2、获取当前锁的状态,0 表示没有被线程占有,>0 表示锁被别的线程占有
            int c = getState();
            // 3、如果锁没有被线程占有
            if (c == 0) {
                 // 3.1、 使用CAS去获取锁,   为什么用case呢,防止在获取c之后 c的状态被修改了,保证原子性
                if (compareAndSetState(0, acquires)) {
                    // 3.2、设置独占锁
                    setExclusiveOwnerThread(current);
                    // 3.3、当前线程获取到锁后,直接发挥true
                    return true;
                }
            }
            // 4、判断当前占有锁的线程是不是自己
            else if (current == getExclusiveOwnerThread()) {
                // 4.1 可重入锁,加+1
                int nextc = c + acquires;
                if (nextc < 0) // overflow
                    throw new Error("Maximum lock count exceeded");
                 // 4.2 设置锁的状态
                setState(nextc);
                return true;
            }
            return false;
        }
addWaiter方法分析
这个方法是为了将阻塞线程加入CLH队列,当CLH队列中有节点时,我们直接在尾部加上,但是如果该线程是一个被阻塞的线程,那就要对CLH队列初始化,考虑到多线程的情况,在初始化的时候有一个关键操作是使用for循环初始化
 private Node addWaiter(Node mode) {
 		// 1、初始化当前线程节点,虚拟节点
        Node node = new Node(Thread.currentThread(), mode);
        // Try the fast path of enq; backup to full enq on failure
        // 2、获取尾节点,初始进入节点是null
        Node pred = tail;
        // 3、如果尾节点不为null,怎将当前线程节点放到队列尾部,并返回当前节点
        if (pred != null) {
            node.prev = pred;
            if (compareAndSetTail(pred, node)) {
                pred.next = node;
                return node;
            }
        }
        // 如果尾节点为null(其实是链表没有初始化),怎进入enq方法
        enq(node);
        return node;
    }

   // 这个方法可以认为是初始化链表
   private Node enq(final Node node) {
   		// 1、入队 : 为什么要用循环呢?
        for (;;) {
           // 获取尾节点
            Node t = tail;
           // 2、尾节点为null
            if (t == null) { // Must initialize
               // 2.1 初始话头结点和尾节点
                if (compareAndSetHead(new Node()))
                    tail = head;
            }
            // 3、将当前节点加入链表尾部
            else {
                node.prev = t;
                if (compareAndSetTail(t, node)) {
                    t.next = node;
                    return t;
                }
            }
        }
    }
为什么enq要用for(;;)吗? 咋一看最多只要循环2次啊! 答疑来了,这是对于单线程来说确实是这样的,但是对于多线程来说,有可能在第2部完成之后就被别的线程先执行入链表了,这时候第3步cas之后发现不成功了,怎么办?只能再一次循环去尝试加入链表,直到成功为止。
aquireQueed分析
这个方法是为了更新等待队列中的线程的等待状态
 final boolean acquireQueued(final Node node, int arg) {
         // 失败标识
        boolean failed = true;
        try {
            // 中断标识
            boolean interrupted = false;
            for (;;) {
                // 获取当前节点的前一个节点
                final Node p = node.predecessor();
                // 1、如果前节点是头结点,那么去尝试获取锁
                if (p == head && tryAcquire(arg)) {
                    // 重置头结点
                    setHead(node);
                    p.next = null; // help GC
                    // 获得锁
                    failed = false;
                    // 返回false,节点获得锁,,,然后现在只有自己一个线程了这个时候就会自己唤醒自己
                    // 使用的是acquire中的selfInterrupt();
                    return interrupted;
                }
                // 2、如果线程没有获得锁,且节点waitStatus=0,shouldParkAfterFailedAcquire并将节点的waitStatus赋值为-1
                //parkAndCheckInterrupt将线程park,进入等待模式,
                if (shouldParkAfterFailedAcquire(p, node) &&
                    parkAndCheckInterrupt())
                    interrupted = true;
            }
        } finally {
            if (failed)
                cancelAcquire(node);
        }
    }

private static boolean shouldParkAfterFailedAcquire(Node pred, Node node) {
        int ws = pred.waitStatus;
        if (ws == Node.SIGNAL)
            /*
             * This node has already set status asking a release
             * to signal it, so it can safely park.
             */
            return true;
        if (ws > 0) {
            /*
             * Predecessor was cancelled. Skip over predecessors and
             * indicate retry.
             */
            do {
                node.prev = pred = pred.prev;
            } while (pred.waitStatus > 0);
            pred.next = node;
        } else {
            /*
             * waitStatus must be 0 or PROPAGATE.  Indicate that we
             * need a signal, but don't park yet.  Caller will need to
             * retry to make sure it cannot acquire before parking.
             */
            compareAndSetWaitStatus(pred, ws, Node.SIGNAL);
        }
        return false;
    }
Unlock源码分析
  public final boolean release(int arg) {
         // 如果成功释放独占锁,
        if (tryRelease(arg)) {
            Node h = head;
            // 如果头结点不为null,且后续有入队结点
            if (h != null && h.waitStatus != 0)
                //释放当前线程,并激活等待队里的第一个有效节点
                unparkSuccessor(h);
            return true;
        }
        return false;
    }
    // 如果释放锁着返回true,否者返回false
    // 并且将sate 设置为0
 protected final boolean tryRelease(int releases) {
            int c = getState() - releases;
            if (Thread.currentThread() != getExclusiveOwnerThread())
                throw new IllegalMonitorStateException();
            boolean free = false;
            if (c == 0) {
                free = true;
                setExclusiveOwnerThread(null);
            }
            setState(c);
            return free;
        }


  private void unparkSuccessor(Node node) {
        /*
         * If status is negative (i.e., possibly needing signal) try
         * to clear in anticipation of signalling.  It is OK if this
         * fails or if status is changed by waiting thread.
         */
        int ws = node.waitStatus;
        if (ws < 0)
            // 重置头结点的状态waitStatus
            compareAndSetWaitStatus(node, ws, 0);

        /*
         * Thread to unpark is held in successor, which is normally
         * just the next node.  But if cancelled or apparently null,
         * traverse backwards from tail to find the actual
         * non-cancelled successor.
         */
         // 获取头结点的下一个节点
        Node s = node.next;
        // s.waitStatus > 0 为取消状态 ,结点为空且被取消
        if (s == null || s.waitStatus > 0) {
            s = null;
            // 获取队列里没有cancel的最前面的节点
            for (Node t = tail; t != null && t != node; t = t.prev)
                if (t.waitStatus <= 0)
                    s = t;
        }
        // 如果节点s不为null,则获得锁
        if (s != null)
            LockSupport.unpark(s.thread);
    }
JAVA多线程主线程等待其他线程的结果
尝试使用while循环轮询
Thread t = new Thread(() -> {
    //子线程进行字符串连接操作
    int num = 1000;
    String s = "";
    for (int i = 0; i < num; i++) {
        s += "Java";
    }
    System.out.println("t Over");
});
//开始计时
long start = System.currentTimeMillis();
System.out.println("start = " + start);
t.start();
long end = 0;
while(t.isAlive() == true){//t.getState() != State.TERMINATED这两种判断方式都可以
    end = System.currentTimeMillis();
}
System.out.println("end = " + end);
System.out.println("end - start = " + (end - start));
但这样太消耗cpu
使用Thread的join()方法
while(t.isAlive() == true){
    end = System.currentTimeMillis();
    try {
        Thread.sleep(10);
    }catch (InterruptedException e){
        e.printStackTrace();
    }
}
sychornized等待唤醒机制
Thread t = new Thread(() -> {
    int num = 1000;
    String s = "";
    for (int i = 0; i < num; i++) {
        s += "Java";
    }
    System.out.println("t Over");
    synchronized (lock) {//获取对象锁
        lock.notify();//子线程唤醒
    }
});
//计时
long start = System.currentTimeMillis();
System.out.println("start = " + start);
//启动子线程
t.start();
try {
    synchronized (lock) {//这里也是一样
        lock.wait();//主线程等待
    }
} catch (InterruptedException e) {
    e.printStackTrace();
}
long end = System.currentTimeMillis();
System.out.println("end = " + end);
System.out.println("end - start = " + (end - start));
Countdownlatch
简单来说,CountDownLatch类是一个计数器,可以设置初始线程数(设置后不能改变),在子线程结束时调用countDown()方法可以使线程数减一,最终为0的时候,调用CountDownLatch的成员方法wait()的线程就会取消BLOKED阻塞状态,进入RUNNABLE从而继续执行。
int threadNumber = 1;
final CountDownLatch cdl = new CountDownLatch(threadNumber);//参数为线程个数

Thread t = new Thread(() -> {
    int num = 1000;
    String s = "";
    for (int i = 0; i < num; i++) {
        s += "Java";
    }
    System.out.println("t Over");
    cdl.countDown();//此方法是CountDownLatch的线程数-1
});

long start = System.currentTimeMillis();
System.out.println("start = " + start);
t.start();
//线程启动后调用countDownLatch方法
try {
    cdl.await();//需要捕获异常,当其中线程数为0时这里才会继续运行
}catch (InterruptedException e){
    e.printStackTrace();
}
long end = System.currentTimeMillis();
System.out.println("end = " + end);
System.out.println("end - start = " + (end - start));
Future
ExecutorService executorService = Executors.newFixedThreadPool(1);

Thread t = new Thread(() -> {
    int num = 1000;
    String s = "";
    for (int i = 0; i < num; i++) {
        s += "Java";
    }
    System.out.println("t Over");
});
long start = System.currentTimeMillis();
System.out.println("start = " + start);
Future future = executorService.submit(t);//子线程启动
try {
    future.get();//需要捕获两种异常
}catch (InterruptedException e){
    e.printStackTrace();
}catch (ExecutionException e){
    e.printStackTrace();
}
long end = System.currentTimeMillis();
System.out.println("end = " + end);
System.out.println("end - start = " + (end - start));
executorService.shutdown();
BlockingQueue
同时,在concurrent包中,还提供了BlockingQueue(队列)来操作线程,BlockingQueue的主要的用法是在线程间安全有效的传递数据。
 BlockingQueue queue = new ArrayBlockingQueue(1);//数组型队列,长度为1
Thread t = new Thread(() -> {
    int num = 1000;
    String s = "";
    for (int i = 0; i < num; i++) {
        s += "Java";
    }
    System.out.println("t Over");
    try {
        queue.put("OK");//在队列中加入数据
    } catch (InterruptedException e) {
        e.printStackTrace();
    }
});
long start = System.currentTimeMillis();
System.out.println("start = " + start);
t.start();
try {
    queue.take();//主线程在队列中获取数据,take()方法会阻塞队列,ps还有不会阻塞的方法
} catch (InterruptedException e) {
    e.printStackTrace();
}
long end = System.currentTimeMillis();
System.out.println("end = " + end);
System.out.println("end - start = " + (end - start));
CyclicBairrer
 public class Test {
    public static void main(String[] args) {
        int N = 4;
        CyclicBarrier barrier  = new CyclicBarrier(N,new Runnable() {
            @Override
            public void run() {
                System.out.println("当前线程"+Thread.currentThread().getName());
            }
        });

        for(int i=0;i<N;i++)
            new Writer(barrier).start();
    }
    static class Writer extends Thread{
        private CyclicBarrier cyclicBarrier;
        public Writer(CyclicBarrier cyclicBarrier) {
            this.cyclicBarrier = cyclicBarrier;
        }

        @Override
        public void run() {
            System.out.println("线程"+Thread.currentThread().getName()+"正在写入数据...");
            try {
                Thread.sleep(5000);      //以睡眠来模拟写入数据操作
                System.out.println("线程"+Thread.currentThread().getName()+"写入数据完毕,等待其他线程写入完毕");
                cyclicBarrier.await();
            } catch (InterruptedException e) {
                e.printStackTrace();
            }catch(BrokenBarrierException e){
                e.printStackTrace();
            }
            System.out.println("所有线程写入完毕,继续处理其他任务...");
        }
    }
}
LockSupport
 Thread mainThread = Thread.currentThread();
Thread t = new Thread(() -> {
    //子线程进行字符串连接操作
    int num = 1000;
    String s = "";
    for (int i = 0; i < num; i++) {
        s += "Java";
    }
    System.out.println("t Over");
    LockSupport.unpark(mainThread);
});
//开始计时
long start = System.currentTimeMillis();
System.out.println("start = " + start);
t.start();
LockSupport.park();// 相当于暂停主线程
long end = System.currentTimeMillis();
System.out.println("end = " + end);
System.out.println("end - start = " + (end - start));

